Sign up now and start getting your team organized!
Getting started is simplicity itself!
Getting Started with Plan19
Introduction
Plan19 is a lightweight ToDo manager designed for team collaboration and task visibility and sharing. It is ideal for small teams that work closely together, such as software development teams. You can have as many users in your account as you like, we like ‘simple’! You can choose to either have all teams and team members work in a single Plan19 account, or you can set up discrete accounts for each group or team. It depends on whether the teams share visibilty and Boards/Cards. For most people, a single account for all your teams is all that you require. If you use discrete accounts, items are private to that account and cannot be shared outside the account members.
Support
If you have any issues, please send an email to support@plan19.com.
Create your Account
It is free to set up a new Account, and add Users to that Account.
Team members in the account can assign tasks to other team members in the account.
When you create your new account, you will add your first user to manage that – this user has role of “admin” and can view and edit most data in your team account.
The Admin role user can then log in, and add other users to join the team too. Users will typically be your teammates and will have a role of “member”, but you can also add people outside your company if they participate in your team activities. In this way you may keep all your internal Boards private to the team, but you can add Cards for an external person – they will only see the Cards assigned to them plus any Boards of their own they create within your team Account.
Managing Tasks
The main user interface for creating tasks is based on Kanban style of task management with a drag-and-drop visual interface, showing Boards, Lists and Cards.
Users can create Boards; Boards can contain Lists, and Lists contain Cards, and a Card represents a task or item to do, with start date, due date, amongst other attributes.
Lists and Cards by default ‘belong’ to the Board owner – the person that created the Board. And each Card can be assigned to any other user on the team.
Cards can be given a Category too! So you can organize tasks by type of work, not just by the List the Card appears in.
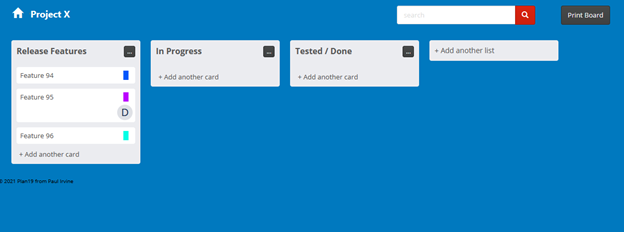
For example, you may create two boards for “Personal Tasks” and “Project X”.
Project X might be a software development project. Typically, you may have Lists for major phases of the development, or you might organize your Lists based on major product feature – its your choice how you organize Lists.
As each card in the Project gets worked, you may move it ( drag it or edit it ) to a List named “In Progress”, or “Done” once you’ve got it all set as you need.
Or you can keep the card in place, and simply edit its “Percent Done”. Edit the card and enter a value for percent done. This is often done to indicate that a Card is finished earlier than its Due Date. Typically, a Card that appears on the Gantt timeline will have a percent shading based on the current date relative to the start/due dates for the Card. The Gantt view will assume that items with no Percent Done specified will be computed a percentage based on today’s date.
If you want to ‘move’ a card on the timeline, double click and edit the card, and set the start Date and/or Due Date values accordingly.
Once you’ve got a few Cards and Lists and Boards set up, switch to GANTT view and you can see all your Boards, Lists and Cards on the timeline.
Sometimes managing Boards, Lists, and Cards is easier in a classic grid layout instead of the Kanban approach.
Use the menu options All Boards to see a list of all your Boards. Account Admin roles can see ALL Boards in their account, whereas Members can only list and manage their own Boards.
You can drill down to Lists from any Board.
You can also view All Lists – this will present all Lists from all Boards you own in one place.
Similarly, view All Cards will let you see and manage all of your Cards in one place, regardless of which Board they were created in. This can be very handy for searching for an item in a busy administration, and not being able to recall which List or Board it was on!
Admin users on the account can manage all Boards, Lists, and Cards for all users, which can be useful in some cases where boards may need to be reassigned owners.
GANTT view
To see how your Boards, Lists, and Cards look in a timeline, switch to GANTT view, and in default mode, you will see all of your own Boards/Lists/Cards.
Double click any Board or List to expand or hide its sub levels.
Double click any Card (in the list or the timeline) to edit that card.
Cards can be edited for Percent Done, Start date, Due Date, and can be assigned to other team members.
Boards and Task Visibility on the Gantt Timeline
You will always see your own Boards, Lists, and Cards on the Gantt view.
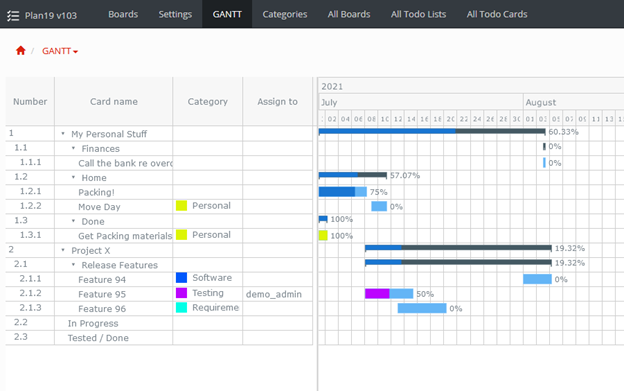
In the illustration above, I have a ‘personal stuff’ board, and a board for ‘Project X’. These will only appear on my Gantt timeline.
You can see that I have assigned one card in Project X to another user, demo_admin in this case.
When user demo_admin logs in, and goes to Gantt view, they will see only their own Boards, Lists and Cards:-
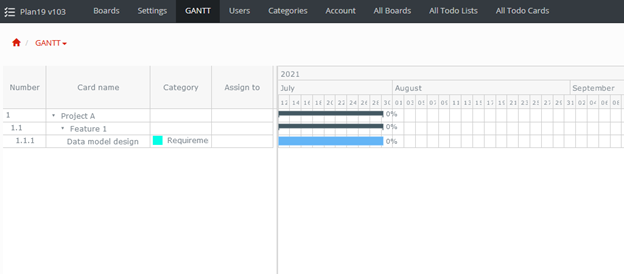
User demo_admin only has one Board of their own, for ‘Project A’.
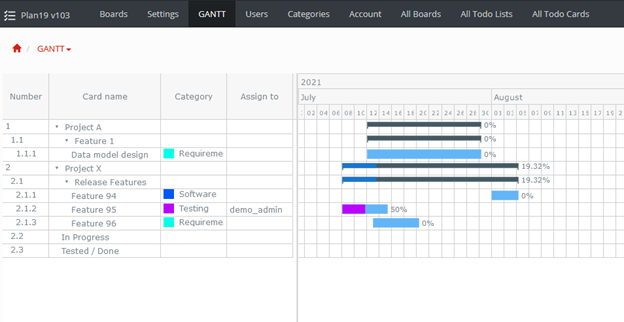
As user demo_admin, clicking the Settings option, they can now check the option for “show assignments from other Boards”.
When they refresh the Gantt view, they now see their own Boards listed first, then they see the Board that they have an assignment on, in this case, Project X, Card ‘Feature95’ was assigned to demo_admin (by demo_member), and so the Project X card shows.
The All Boards, All Lists and All Cards views
Kanban style is great for setting up Boards, Lists, and Cards, and editing the Cards, either by dragging from one list to another – In Progress to Done perhaps . When you have a busy Boards view though, finding some Cards can be time consuming.
Using the All Cards view lets you view all Cards that are on all your Boards in one place.
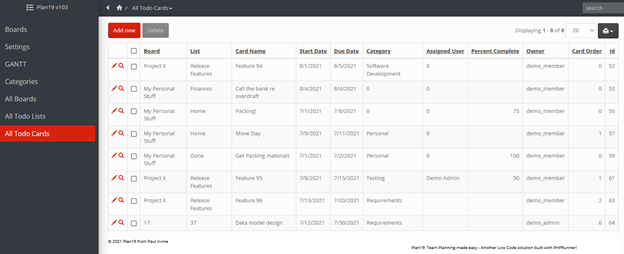
Use the Quick search to find items, or use the Advanced Search for more complex searching.
The Advanced Search feature is accessed by the Gear icon at the top right of the menu bar.
Exporting Data
The All Cards (and All Boards, All Lists) view, is the simplest way to export data to e.g., Excel, for further manipulation and formatting.